Saturday, 22 December 2012

FOTN with Wet n Wild Lust, Laura Mercier and Le Metier de Beaute

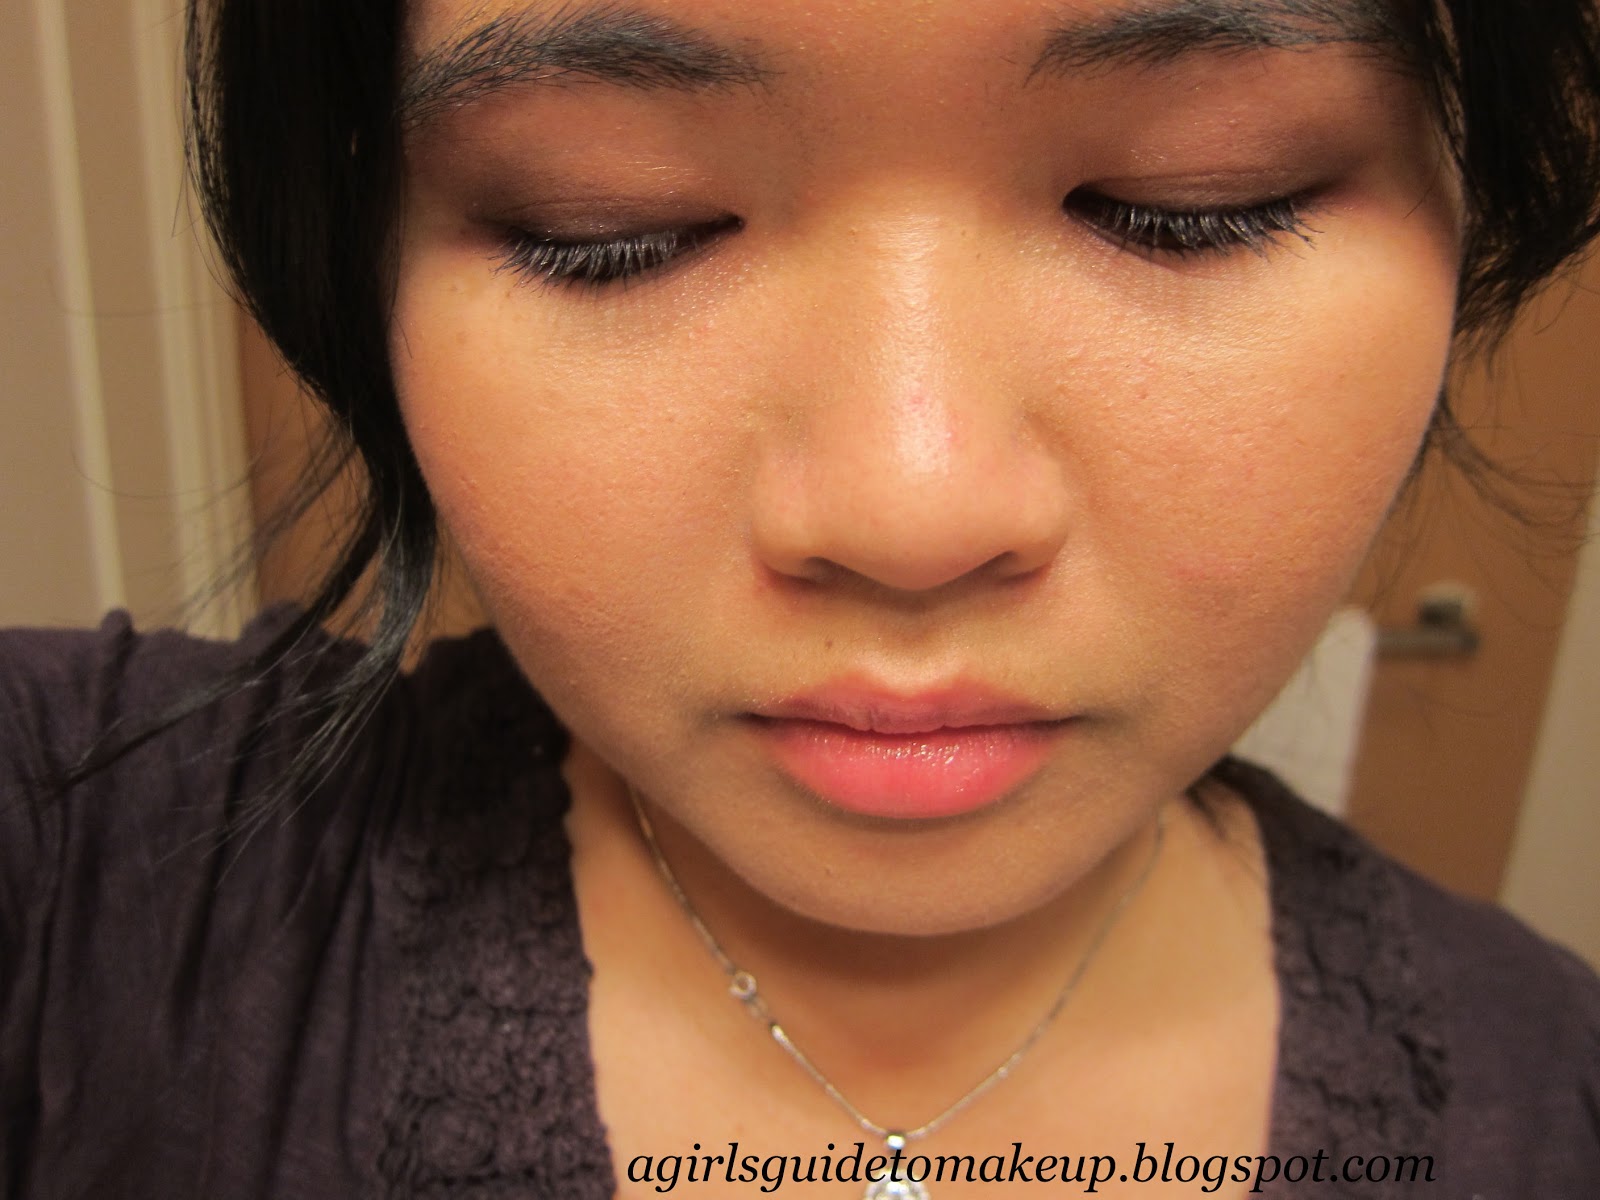
Hi guys!! I'm doing a short post today to show you the makeup that I did last night for my father-in-law's dinner party :)

Without further ado, here are the pictures... Pardon my amateur blending skills LOL I used the beige colour in the WnW Lust palette to blend out the harsh edges, and while it is quite subtle in real life (certainly subtle in dim lighting, too), I had the flash firing for all my shots and so it looks quite stark.


The eyeshadows I have chosen for this look are very dark, but it hardly shows up in pictures because of my hooded eyelids :) For this reason, I usually tend to favour darker eyeshadows to define my eyes.


The picture below was taken by my niece on her phone. It shows how my makeup looked during dinner (no flash, artificial lighting).


Product Breakdown:
Le Metier de Beaute Peau Vierge in Shade 2
Laura Mercier Silk Creme in Sand Beige 
YSL Touche Eclat in #3
Laura Mercier Translucent Loose Powder (on cheeks and T-zone)
Laura Mercier Canyon Sunset Blush
Wet n Wild Lust Palette
Urban Decay Primer Potion

Hope you enjoyed this short update.

xx Cindy

Friday, 21 December 2012

Revlon Colorburst Lip Butter - Reviews and Swatches

During my trip to the US, I stumbled into a Walgreens in a quest to buy necessities like water and bread and milk. Like any makeup obsessed blogger out there, I wandered over to the cosmetics section and found a thrilling bargain in Revlon Colour Burst Lip Butters. It was a BOGO half off promotion and I snagged three. A friend of mine also wanted one ;)


The three shades I selected were those I deemed daily wear/ office appropriate.


Strawberry shortcake is a warm baby pink that really pops on my skintone. I'm currently sporting a dark tan (eventhough I don't go to the beach etc... ) courtesy of Perth's nightmare-ish dry heat in the summer.


Cotton candy is blue based light pink. On my lips, the coolness of this shade is unmistakeable. 


Peach parfait is a beautiful sheer peach which hardly shows up on my lips. I think this is a perfect, go-with-anything lip shade that I can rely on when I'm short on time :D


Another shot of Peach Parfait. The color shows up better in this picture.


Arm swatches are shown below. This was taken under artificial lighting as the sun had gone down by the time I came home.


These Revlon Lip Butters are basically tinted lip balms with a nice smooth buttery finish on the lips. I can not say that these are the most moisturising lip products on the market, but in the category of tinted lip balms, these are very good indeed. My favourite hydrating balms is still the Chanel Rouge Coco Shine Hydrating Lipsticks :)

All shades have microshimmers, with Peach Parfait being the most gritty in texture. I was actually surprised at this because it looks so beautiful in the tube. Strawberry Shortcake is the most frosty, and Cotton Candy is the most satiny. Both Strawberry Shortcake and Cotton Candy have a smoother texture and finish when compared to Peach Parfait.


I also picked up this Carved Citrine Ring from Gallery of Jewels in San Fransisco and I have been wearing it every day since I purchased it. I absolutely love this ring design and the detail that goes into making this beauty! The artisan jeweller who made this ring is Vanessa Mallet.


Hope you have enjoyed this post! See you soon :D

xx Cindy

FOTD in Shu Uemura Prestigious Bordeaux and Ciate Nails

Just a quick post to fill the gap that is my absence for the last 4 weeks. I have been traveling around the US and Canada and I simply had no time to do any post updates.

On another note, I have decided to take another job prior to leaving on this holiday and so the past 6 weeks have been simply hectic!!


Haha... I can't stop giggling at the above picture. I am no nail or hand model alright.


These pictures were taken after I came home from a full day of shopping etc. I was happy to see that the shadows held up beautifully over my Shu Uemura cream eyeshadow base. I purchased Urban Decay's eyeshadow primer potion in the US and its actually so much better than the Shu!! 


Product breakdown:
- Laura Mercier Silk Creme Foundation in Sand Beige
- Becca Anniversary Palette in Dusty Rose on cheeks (Tuberose lip & cheek creme and Narcissus highlighter)
- Shu Uemura Prestigious Bordeaux palette (bronze on eyelid, dark purple in outer v and lower lashline, light purple to blend harsh edges and lightly on the inner corner, light tan on the inner eyelid, gold glitter in the middle of the lid) - I love the colours on this palette!! Rich, jewel tones are the bomb!
- Maybelline Falsies Mascara 

Hope you enjoyed this look!! 

xx Cindy

Tuesday, 20 November 2012

A Look in Perfectly Lush Lashes

I met up with Sin Wei to do her makeup and nails and asked if she would once again let me feature the photos on my blog. I was doing her makeup and nails for a party which would take place that night, so I needed something simple and long lasting (makeup and photos were done between 7 am - 9 am).

Originally, I wanted to do a Lash Application tutorial with these photos, but its actually quite a well covered blog topic already so I didn't think that it warranted a feature. I will try to give some guidance on how to best apply it for a natural look, but for the most part, I will be talking mainly about her makeup :)


Base Products:
- Laura Mercier Silk Creme in Cashew Beige
- NARS Concealer in Cinnamon
- Laura Mercier Translucent Loose Powder
- Illamasqua Bronzing Powder Duo to contour and lightly bronze


For the eyes, I used Giorgio Armani's Eyes To Kill Intense in #16. I had Chanel's Harmonie du Soir (review here) quad with me so I dabbed my brush lightly in the taupe and used that to blend out the harsh edges. I also used the gold to highlight the inner corner and the violet plum to line the upper lashes.

The lower lashes were lined with the same ETKI shade and I used the violet plum again on the outer corner.

For the lips, I used the third tier from my LMdB Les Artistes kit (reviewed here).


False lashes usually need to be trimmed, unless you have huge eyes and depending on the brand of lashes you buy. The ones I have used in this feature is the Princess Cross Lashes (Ebay), which I bought because of Reika's recommendation (Front Row Beauty). I think these lashes are fine (and so cheap!), but my absolute favourites would have to be either:
- Shu Uemura Partial Flare Lashes (soft accent to the eyes)
- Shu Uemura Smoky Layers (beautiful criss cross lashes)
- Ardell Natural Lashes (the base is soft and pliable, and therefore follows the lashline perfectly)

The placement of the inner lashes should be about 5 mm away from the inner corner of your eyes or more, depending on when your lashes start to thicken. If you apply the false lashes right where your lashes begin, I find the effect less subtle and you probably need to thicken your eyeliner to make it look less obvious/jarring. Just my personal preference. 

Again, for the most natural look, the outer end of the falsies should be where your natural lashes end.


I hope you have enjoyed the photos :) Sorry the pictures are a bit dim, the sun was out in full force and so we had to hide under a tree to take half decent shots of the makeup :D

Cindy xx

Ciate Polish and Caviar Beads - Review

I've recently discovered a new nail polish brand called Ciate, and I could not be more excited to show you this post.

Ciate is a company that produces a relatively new brand of nail art whereby you sprinkle and press either caviar beads (featured here), velvet powder (makes your polishes velvety), or sequins.

The quality of the polishes themselves vary between shades. I have tested them in store and found some beautiful colours that are either a little runny or streaky. Most of the polishes are rather good, though :D


I purchased the christmas set from Mecca Cosmetica for 42 AUD, and it comes in a super festive box entirely covered with a picture of caviars and sequins. The set is called the Caviar Mini Bar and comes with four polishes and four caviars. A funnel is provided so you can pour back fallen caviars into the little pots. Nothing is wasted!


Lets look at the selection of colours in this set. The polishes consist of a bright rosy pink, a corally orange, a silver and a gold. I find both silver and gold to be a little thin, but t is very easy to apply. Three coats is required for opacity but if you are going to use the caviar beads, two coats should suffice.

The pink and orange have a slightly thicker consistency, and therefore I think it would create a stronger "base" for the caviars. Both have very nice pigmentation and finish and out of the four available colours, I would definitely wear these two on their own. The metallics are just too sheer for my liking.


The beads' colours are probably a little hard to tell from my photo but I shall try to describe them for you :). Starting from the left:
- Violet/Navy, Red, Silver Caviars and Silver Sequins
- Turquoise, Pink and Clear Caviars
- Silver Caviars
- Turquoise, Pink, and Orange Caviars

In this feature, I will show you how the gold pairs with the turquioise-pink-orange caviars (the two pots at most left in the picture above)


The picture below shows the polish at one coat. 

The picture below shows the polish at TWO coats (slightly more opaque).

BEADS BEADS BEADS!!!

Okay, so how do we apply the caviar nails? I can break it down for you into four very simple steps :D
Step 1. Apply one coat of polish. Let dry.
Step 2. Apply second coat of polish. DO NOT wait for this coat to dry.
Step 3. Sprinkle caviars straight from the pots. You can apply as liberally as you like. I prefer a more sparse application to let some of the gold polish shine through.
Step 4. Press caviars down onto the nail bed to ensure adherence.


I really love how cool and different my nails look this weekend :D This manicure is extremely addictive, short lived (2 days), and not to mention fun! Don't say I didn't warn you :)

I highly recommend that you at least TRY Ciate manicures. I could not stop looking at my nails all weekend!

Cindy xx

Friday, 16 November 2012

Chantecaille L'Elephant Palette - Review and Swatches

I purchased Chantecaille's latest philantropic palette, L'Elephant, weeks ago. Claire purchased it for me from the US and posted it so I dont have to pay the hefty price tag of AUD 120.


 What can I say about this palette?? That it was:
- disappointing
- overpriced 
- the worst palette I ever swatched?


The only nice shade is Ivory, which is consistent with the quality of the permanent Chantecaille eyeshadows.
Grasslands and Iron Ore have this hardened texture, and the shadows were very difficult to pick up with a brush, much less my fingertips. Red Earth has so-so texture, but the colour is beautiful and I could pick up the shadow just fine with my eyeshadow brush.


Ivory is a bone white with shimmer, grasslands is an ultra sheer slightly blackened shimmery green, iron ore is blackened brown with silver glitter, and red earth is the perfect shade of copper. 
 

Overall, two out of four shades ain't bad, but it ain't great either. For what you are paying, these palettes need to be amazing and so far, in my experience, they have been amazing. If you want to try another Chantecaille Palette, I suggest you try Tiger In The Wild :) That palette is just gorgeous!!

Cindy

Shu Uemura Mon Shu Collection (Karl Lagerfeld) - First Impressions and Swatches

As you may have noticed, there have been a few little changes to the blog that I have been making in order to mix things up a little. I realised that I much preferred the old layout (simpler, all photos laid out etc) because I can see all the little details as soon as I open the page. 

Also, I've been branding all my photos with the website name. For this post, I actually forgot to do that prior to uploading all the pictures. Oh well...

The Mon Shu Collection has recently hit David Jones across Australia and I (unexpectedly) picked up a few items. The reasons being:
- Scary Dora isn't as scary in real life as the promotional photos
- The palette price is AUD 88, which is significantly less than the prices of previous palettes


This collection comes with its own Shu Uemura paper bag! How cute :)

Since I purchased three items from the collection (totalling over AUD 150), I received a complimentary Shu Uemura/Karl Lagerfeld cosmetics couch decorated with the Mon Shu theme. The red shimmery colour of this cosmetic case is amazing!

I purchased three items from this collection, the Prestigious Bordeaux palette (browns and purples), the Blackish Purple Eyeliner, and the Special Edition Mon Shu Eyelash Curler.

The back of the palette box...

The eyeliner box...

The spiel on the back of the eyelash curler box...

I think I am MOST excited about the eyelash curler. I see this as a collectible and I don't think I will ever use it :)


The shape of the curler is consistent with the original. The only difference being the red rubber lining and the detachable charm.

Back view...

Side View...


I have never done a review of the Shu Uemura eyelash curler before, but I just want to say that it is amazing!! It curls my eyelashes beautifully and I am so glad I took a chance and tried it. I think this product is AUD 50.

The palette , Prestigious Bordeaux is a beautiful mix of shimmery browns and purples. There is a gold glitter pan and also a red blush with a touch of teracotta.

Upon swatching, I realised that the top two shadows are cream (still not sure about this, it looks like powder but its sooo soft and creamy). The middle two are definitely powder though. All four eyeshadows are so pigmented (swatches are at the bottom of this post) with amazing texture. Its blowing my mind right now!! 

The festive gold glitter accent applies beautifully, and adheres to the skin well with little fallout. The blush is a little patchy, but I think if you use the right blush brush, this can work really well and look natural.


The cover of the palette... what is with the red eyes, Karl? Seriously.

Scary Dora is also on the lid of the eyeliner. She won't stop me from using this baby though. The colour is truly blackish purple (brown) with shimmer. Again, so creamy and long lasting. My arm is still stained from where I swatched the liner. 


Finally, I will let my swatches do the talking. These colours are so much more beautiful in real life. The dark purple cream shadow has multicolour shimmer strewn throughout, and the pinky lilac shadow is also quite shimmery.
 

The liner is swatched on the left (thin line and thicker smudged band). The palette is swatched next to these and the blusher on top.


Overall, I love this collection. Not super thrilled about the packaging, but the quality of these products are outstanding. I expected nothing less from such a collaboration between a fashion powerhouse icon and Mr Shu!! 

Hope this post has been helpful. 

Cindy xx